...with an English Keyboard
...with a Hebrew keyboard
...with Graphics
...with an English Keyboard
The simplest method of typing in Hebrew, especially if you are just typing a few letters or words, is to download a Hebrew font for the English keyboard (left to right typing). These type of fonts work the same as any other font you place in your computer, the drawback being that you have to type the Hebrew words backwards. For example, in order to type the word אלהים (elohiym) you would need to type the final mem (ם), the yud (י), the hey (ה), the lamed (ל) and then the aleph (א).
Hebrew Fonts for the English Keyboard
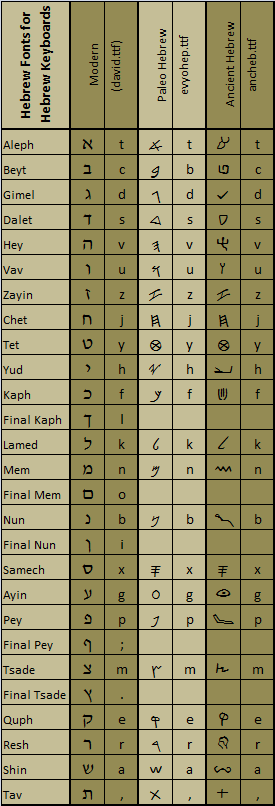
To help with identifying the proper keyboard character for each letter in the fonts listed below, download this handy chart.

Modern Hebrew: Also called the "Aramaic square script," this is the font that is used today in Hebrew Bibles and books as well as the alphabet used in Israel today. [Download]

DSS Hebrew (Late Semtic): This is the Hebrew script used in the Great Isaiah scroll and is representative of the Hebrew found in most of the Dead Sea Scrolls. [Download]

Paleo Hebrew (Middle Semitic): This is the Hebrew alphabet that was in use from about 1200 BCE and into the first century CE. This font was created by the Ebionite.org. [Download]

Moabite Stone (Middle Semitic): This is the script used on the Moabite stone, which is written in Moabite, virtually identical to the Hebrew language and the Paleo-Hebrew script. [Download]

Ancient Hebrew (Early Semitic): This is the original pictographic script used by all Semitic peoples, including the Hebrews, prior to 1200 BCE. [Download]

Early Semitic: This font is similar to the "Ancient Hebrew" font above. It was created by AHRC many years ago (before any ancient Hebrew fonts existed on the internet), but is a little outdated as much better fonts are now available. We have chosen to continue to offer it here as many are still using this font. [Download]
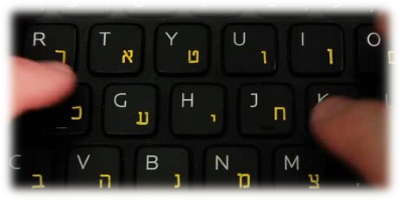
...with a Hebrew keyboard
The best method for typing in Hebrew is to add the Hebrew keyboard to your computer. This will allow you to type in Hebrew from right to left. With the Hebrew keyboard you can use various styles of fonts, much the same way you do with the English keyboard. Here is the Hebrew אלהים in different standard fonts - אלהים (arial), אלהים (Times New Roman) and אלהים (david).
How to add the Hebrew keyboard to your computer
To type in Hebrew (from right to left using the Hebrew alphabet), you’ll need to adjust your computer’s language settings. To find step-by-step instructions, search online for:
“How to add a Hebrew keyboard to my [type of computer]”
For example, you might search:
“How to add a Hebrew keyboard to my Windows 10 PC” or
“How to enable Hebrew typing on a MacBook”
Hebrew Fonts for the Hebrew Keyboard
To help with identifying the proper keyboard character for each letter in the fonts listed below, download this handy chart.
Modern Hebrew: Once your keyboard is set up to type in Hebrew, it will automatically type with Hebrew characters. However, there are plenty of fonts available for Hebrew and if the "david" font is not already on your system, I recommend it. [Download]
Paleo Hebrew (Middle Semitic): This is the Hebrew alphabet that was in use from about 1200 BCE and into the first century CE. This font was created by the Ebionite.org. [Download]
Ancient Hebrew (Early Semitic): This is the original pictographic script used by all Semitic peoples, including the Hebrews, prior to 1200 BCE. [Download]
...with Graphics
Download the Hebrew Font Graphics zip file, which includes images for the ancient, paleo and modern Hebrew alphabets. Unzip the file and place all of the images in a folder, such as "hebrewgraphics," on your computer.
To add the graphics to a document, simply copy and paste the desired graphic or graphics into your document and then adjust the graphic to its desired size.
To add the graphics to a web page use the following html code;
<IMG SRC="hebrewgraphics/ancient_aleph.gif">
Which will appear as follows;